Showing posts with label photography tips. Show all posts

11.13.2014

photography tips | favorite photo editing apps

Since buying my first iPhone - the 3G - in 2010, I have used my phone as my point and shoot camera.  I am still amazed how much better they have gotten over time and with each upgrade the photo quality just gets better and better. 

I have since upgraded to the 5 - albeit barely (the screen is cracked from a drop) - and usually have it nearby because you just never know what will happen that I need to capture.  at least that is my excuse for being on my phone a lot.  Anyway, after I get the image I want and before I post to Instagram or on the blog, I have three steps I go through to edit my iPhone photos. vsco cam, afterlight, and whitagram. 
 
STEP 1: vsco cam app. I only recently discovered vsco cam app in the past few months.  I upload the photo to my library then browse the filters to see which is the best.  I love their filters and in my opinion they are the best around.  While you can download the app for free, you will have to pay for most of the filters.  The cost for the different filters range anywhere from $.99 to $5.99.  They have specials for free or discount filters so I usually take advantage when that happens. 


image via google images

STEP 2: afterlight. I then turn to afterlight to adjust the brightness, contrast, clarity, saturation, etc of the photo.  This app is also a paid one - only $.99 - but is well worth it.  It's like having access to Lightroom or Picmonkey while on the go. 
image via google images

STEP 3: whitagram. Whitagram is another I just recently discovered.  I used to get so annoyed when I would upload my photo to Instagram and the gorgeous landscape I just captured is cropped into a square, eliminating a decent portion of the scene.  But with whitagram, you are able to keep the original size of the photo, with a white background, and upload it to instagram without any of the scene being cropped.  And guess what?!  This one is free.
 image via google images.

It only takes me 5 minutes, if that, to go through these steps before I hit the publish button in Instagram.  I want my photos to look their best when I share them with the world and these three apps help to accomplish that.  

What are your go-to phone photo editing apps?
What's your favorite?
Are you on Instagram?

 Linking up with Nicole and Ash today!


post signature

10.23.2014

photography tips | composition pt. 2

I have not been great about posting photography tips lately like I have promised.  I blame it on getting out of my routine lately.   But like I mentioned Monday, it's a new week and a new me.  

Anyway, today I thought I would continue with some more tips on composition:  depth of field, leading lines, and reflection. 
Depth of Field.  Since a photograph itself is only 2 dimenionsal, depth of field allows the photographer to portray the 3 dimenionsal world in the photo by placing a subject in focus and the blurring the background.     
Tulips in Spring.

Leading Lines.  Lines in the image that lead the eye to another focus point in the image.  
{print available on Society6}
The giant tree trunks of the Redwoods lead your eyes to the top to give you, the viewer, an idea of how tall the trees actually are.  

reflection.  I don't think this one needs much of an explanation, because duh.  Look in windows, puddles, etc the next time you are experimenting with your camera to capture a reflection.
The moonlight's reflection off of the Atlantic ocean in Topsail, NC. 

What have you been photographing lately?  What composition tricks to you tend to gravitate to?  Do you enjoy reading tips on taking better photos?  If so, let me know in the comments what you want to learn about. 

I hope all of this makes sense for you.  Stay tuned next Thursday for the last 3 composition tips, I promise. 

Linking up with Nicole and Ash today!

post signature

10.02.2014

photography tips | composition pt. 1


I know I promised more photography tips sooner, but I have been letting time get away from me and therefore not being terribly productive with the time I have.  It's a new month so what better time to begin again.  


Anyway, today I would like to talk about a few composition tricks for improving your photography.  I originally planned on sharing a lot more but decided to break it up into 3 parts to help it be less overwhelming and perhaps give you a chance to practice.  


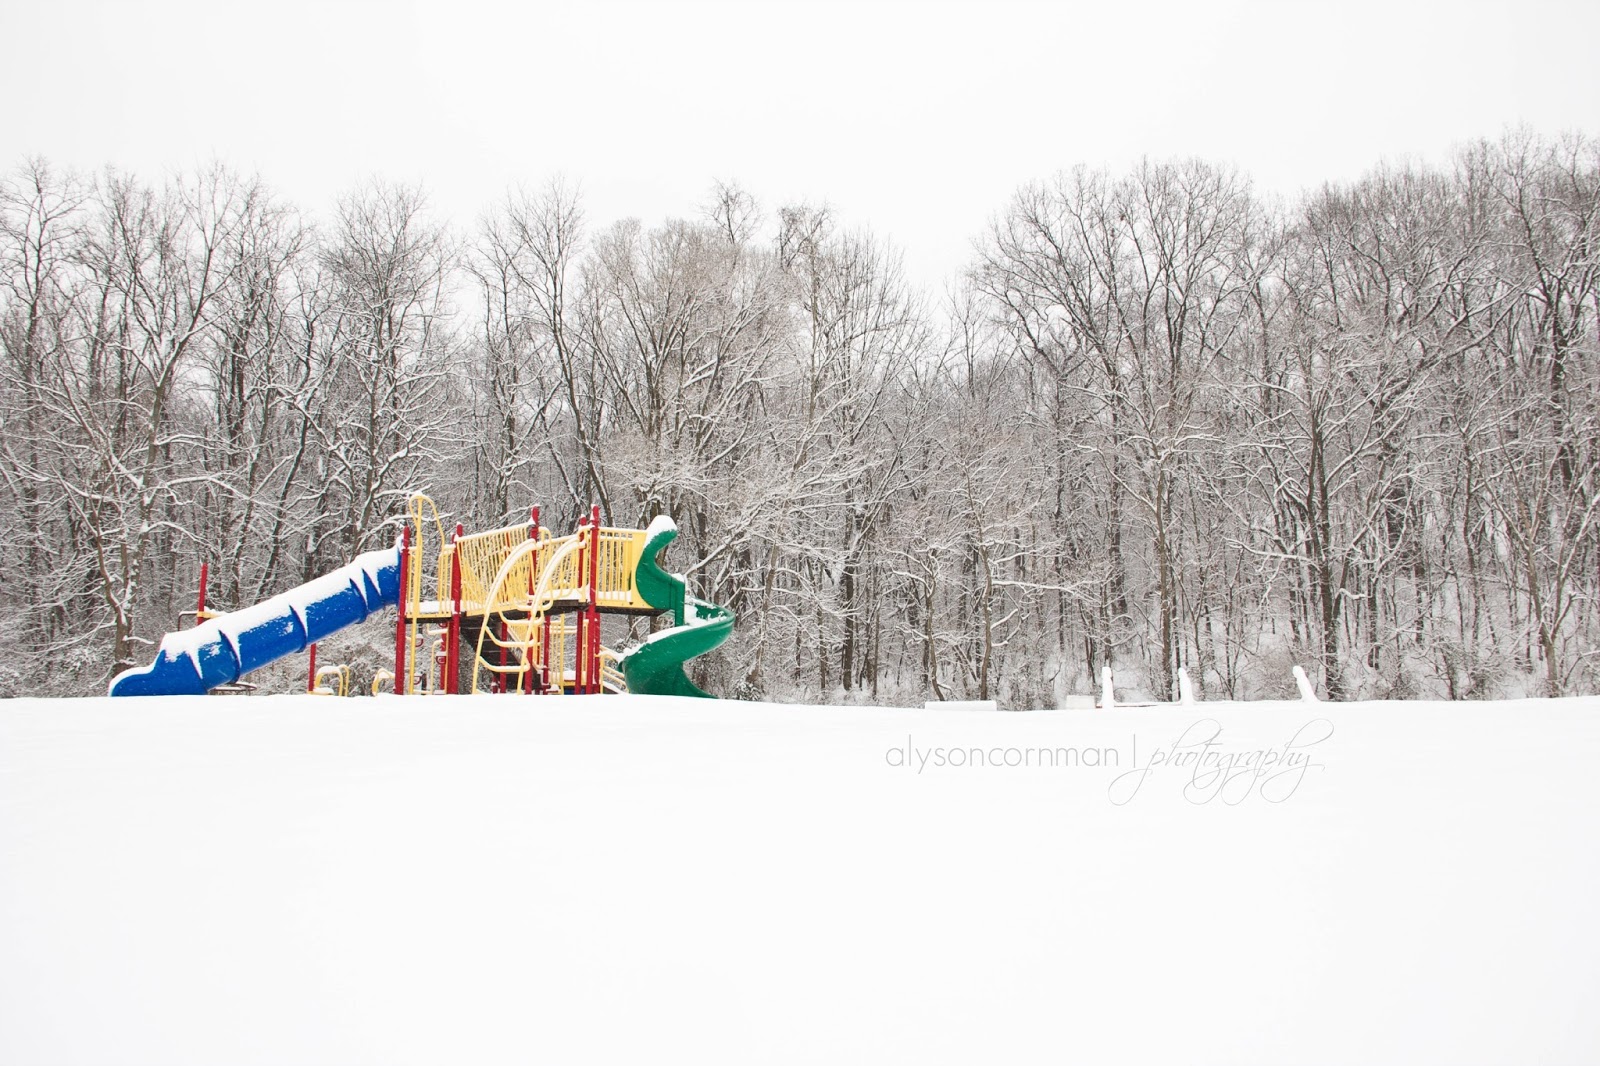
Perhaps one of the most commonly used and popular tricks is the Rule of Thirds.  Imagine two horizontal lines intersecting with two vertical lines making nine even squares in your photo.  The idea is that you place the subject of your photo along those lines or their intersections.  
{print available for purchase on Society6}
The above was taken during a snowy walk around my neighborhood.  I loved the pop of color against the snowy white.  See how the subject, the playground, is off-center in the left third of my image?  This may be my favorite, go-to way to compose a photograph. 


A second favorite is Framing.  This technique draws attention to your subject by blocking out other parts of the image with something else in the scene.  
{print available for purchase on Society6}
I was visiting my aunt and uncle who live in Bay Village, a suburb outside of Cleveland, on Lake Erie.  We walked down to the lake from their house to get some fresh air.  Without the trees, I am not sure you, or I for that matter, would notice the tiny sailboat in the distance.  However, the trees' leaves frame the image very nicely to bring focus to what I wanted to point out. 


One more is to simply get Close-Up.  Regardless if you are shooting with a point-and-shoot, phone, or your nice DSLR, if you want to get a close-up of a scene the best thing you can do is to simply move closer to what you want to capture.  I know it's easier to sometimes zoom in but that just results in yucky grain that is not easy to eliminate in post processing.  
{Print available for purchase on Etsy or Society6}
This was my first photograph I took of my Mother-in-law's beautiful sunflower garden.  I got as close to the flower as I could and captured this shot.  I also really love the bokeh that was created in the background. 

I hope this all made sense for you and helped.  While Rule of Thirds, Framing, and Close-up are rules that photographers like to follow, rules are made to be broken.  Get creative.  Now, it's your turn to get out and shoot away!  

Was this helpful?
What's your favorite way to compose a photo?

 Linking up with Nicole and Ash today!


post signature

9.04.2014

shutter, aperture, and iso oh my

Last Thursday, I asked y'all what you wanted me to talk about Photography related on this here blog.  I got some great questions!  Thank you for asking. I hope what I have to say will help you. 

The first question I received was asking about some tips on taking better photos.  I think one of the most important things to understand to improve your photography is to get better acquainted with Shutter Speed, Aperture, and ISO.  I know you have heard about them before but maybe, like me, find it all to be a little bit overwhelming.  Well, I made a little cheat sheet to help you better understand what each term represents and how it effects your photo.


Shutter Speed or Exposure: The length of time the camera's shutter is open when taking a photo.  The longer the shutter is open the more light comes in resulting in a brighter, better exposed photo.  For those bright sunny days, the faster (or lower the number) the shutter the better.  For those low light situations, the slower (or higher the number) the better.  When using a slow shutter, you want to make sure you have either a tripod or somewhere sturdy to set your camera.  Otherwise if you move even the slightest you will get a blurry photo.  Utilizing the self-timer or buying an off camera trigger is best for those types of situations. 

Aperture or f stop:  The opening in your camera that allows light to travel through.  The higher the f stop the smaller the opening that is allowing light to come in.  The lower the f stop the larger the opening that is allowing more light through. This one is the hardest for me to remember because everything seems opposite.  Also, the smaller the f stop the more focused your subject will be with a blurred background creating that bokeh effect.  The bigger the f stop the more focus the entire scene will be.  

ISO: The measure of sensitivity to light.  The lower the ISO the less sensitive it is while the higher it is the more sensitive it is.  Higher ISO is really only beneficial in low light situations.  Otherwise, when using a high ISO, it creates a lot of grain to the photo.  I keep my ISO around 640 and hardly mess with it. 

I hope this helps a little.  It really does help improve your photography once you understand how these three work together to make the perfect image.  I am still learning how these work but have been shooting in manual for over a year now which has helped me learn better.  The best way to learn is to just take your camera out and experiment.  Stay tuned next week for tips on how to better compose your photo!

Do you already shoot manual?
Any other good tips you can add?
What else would you like me talk about?

Linking up with Nicole and Ash today!

post signature

8.28.2014

what do you want?!


During my blogcation in July I was able to think about where I wanted this blog to go.  I made myself a blogging schedule that I would like to maintain.  On Thursdays, my goal is to share with you, my beautiful readers, something photography related.  Be it the latest addition to my Etsy or Society6 shop or favorite photo apps or tips to taking better photos.  So, I want to hear from YOU!  What do you want see on Thursdays?  

Linking up with Nicole and Ash today!

post signature